Procedure Steps
Under normal circumstances, a Certificate Authority (CA) would generate the server certificates and client certificates. Follow these steps to create a CA, server, and client certificates using OpenSSL:
Install and configure OpenSSL.
- Generate OnGuard Root CA. In the following example, a folder has been created in the C: drive called "certs". Run the following command and supply appropriate values:
openssl req -x509 -nodes -days 365 -newkey rsa:2048 -keyout C:\certs\CA.key –out C:\certs\CA.crt - Convert the CA certificate to PEM format:
openssl x509 -in C:\certs\CA.crt -out C:\certs\CA.pem -outform PEM - Generate a Generic Common Server Certificate Request. Issue it to the server OU name than the CA.
Note: To generate new client and server certificates, start from this step with the existing CA.openssl req -out C:\certs\server.csr -newkey rsa:2048 -nodes -keyout C:\certs\server.key - Generate the Common Server Certificate. The req section of the OpenSSL configuration file must have the following values in the request section, appropriate values can be supplied for state, locality, and so on. In this example, a separate file was created called openssl_client.cfg with only the values below in the configuration file, and the file is specified in the command to generate the server certificate. There is also an optional section which includes subject alternative names for the certificate and / or IP addresses:
[req]
distinguished_name = req_distinguished_name
req_extensions  = v3_req
x509_extensions = usr_cert
[req_distinguished_name]
countryName = Country Name (2 letter code)
countryName_default = US
stateOrProvinceName = State or Province Name (full name)
stateOrProvinceName_default = NY
localityName = Locality Name (eg, city)
localityName_default = Locality
organizationalUnitName = Organizational Unit Name (eg, section)
organizationalUnitName_default = OU-Name
commonName = ServerName
commonName_max = 64
[ v3_req ]
# Extensions to add to a certificate request
basicConstraints = CA:FALSE
keyUsage = nonRepudiation, digitalSignature, keyEncipherment
extendedKeyUsage = serverAuth, clientAuth, codeSigning, emailProtection
subjectAltName = @alt_names
extendedKeyUsage = serverAuth, clientAuth, codeSigning, emailProtection

[alt_names]
DNS.1   = www.example.com
DNS.2   = *.domain.com
IP.1  = 10.10.10.10

[ usr_cert ]
basicConstraints=CA:FALSE
nsCertType = client, server, email
keyUsage = nonRepudiation, digitalSignature, keyEncipherment
extendedKeyUsage = serverAuth, clientAuth, codeSigning, emailProtection
nsComment = "Sample CA Signed Cert"
subjectKeyIdentifier=hash
authorityKeyIdentifier=keyid,issuer
openssl x509 -req -days 500 -sha256 -in C:\certs\server.csr -CA C:\certs\CA.crt -CAkey C:\certs\CA.key -CAcreateserial -out C:\certs\server.pem -extensions v3_req -extfile "C:\Program Files\OpenSSL-Win64\bin\openssl_client.cfg" - Convert the Server Certificate to .pfx format. Leave the export password blank.
openssl pkcs12 -inkey C:\certs\server.key -in C:\certs\server.pem -export -out C:\certs\client.pfx - Convert client.pfx to a PEM format so that it can be converted to the .p12 format required by OnGuard clients and services:
openssl pkcs12 -in C:\certs\client.pfx -nodes -out C:\certs\temp.pem - Convert temp.pem to .p12 format. Leave the export password blank:
openssl pkcs12 -export -in C:\certs\temp.pem -out C:\certs\client.p12
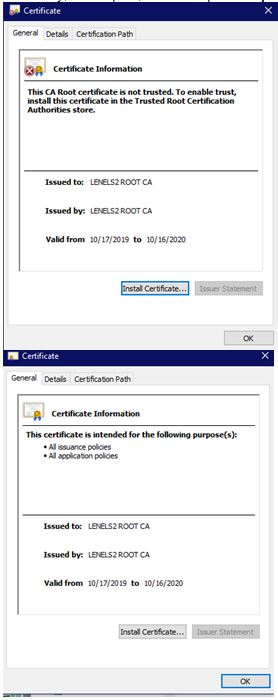
- Ensure the CA is installed and trusted by the host machine(s) that will be using them in the Trusted Root Certification Authorities Store. In this example, copy CA.crt, server.key, server.pem, and client.p12 to %programdata%\lnl\nginx\conf:
- Stop LS Message Broker, RabbitMQ, LS Event Context Provider, LS Communication Server, LS Open Access, LS Web Event Bridge, and LS Web Service services.
- In Task Manager, ensure that the epmd.exe process and erl.exe processes are stopped.
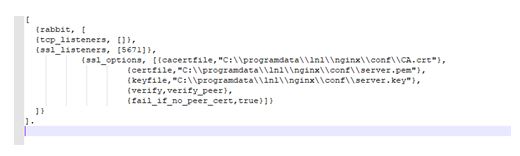
- Open %programdata%\lnl\\RabbitMQ\advanced.config file in a text editor.
- Update fail_if_no_peer_cert, false to true, update cacertfile path, certfile path, and keyfile path. In this example, the files were copied to the default certificate location in %programdata%\lnl\nginx.conf:
- Add the following to the acs.ini file on every client and server machine along with the client.p12 certificate, where CertificatePath equals the path to the .p12 certificate created in step 1:
[LSMessageBrokerClientSecurity]
CertificatePath="C:\ProgramData\Lnl\nginx\conf\client.p12" - Modify xml configuration files for Lnl.OG.EventContextProviderService.exe.config, LnlComsrvr.exe.config, Lnl.OG.LsOpenAccess.exe.config, and Lnl.OG.WebEventBridgeService.exe.config to include the X509 certificate path key location.
- Add the following line to the configuration files:
Note: Failure to correctly modify these files can cause these services to not start.


Event Context Provider:
Lnlcomsrvr.exe:
Lnl.OG.LsOpenAccess.exe.config:
Lnl.OG.WebEventBridgeService.exe.config:
Modify the nginx.conf file to include the new cert names/location located in %programdata%\lnl\nginx\conf\nginx.conf:

Ensure that the Message Broker Host and Open Access Host settings in System Administration > System Options matches the certificate FQDN.
Restart LS Message Broker, LS Communication Server, LS Event Context Provider, LS Open Access, and LS Web Event Bridge.
Applies To
OnGuard 7.5 or later
Additional Information
Supporting RMQ documentation:
https://www.rabbitmq.com/ssl.html
https://www.rabbitmq.com/ssl.html#peer-verification
© 2024 Honeywell International Inc. All Rights Reserved.