LenelS2
1212 Pittsford-Victor Road
Pittsford, New York 14534 USA
Tel 866.788.5095 Fax 585.248.9185
www.LenelS2.com
DOC-2019-EN-US (13 January 2022) © 2022 Carrier Fire and Security Americas Corporation. revision 2 — 1
Configure Milestone XProtect for OnGuard 8.0
Note: Only OnGuard systems that use Microsoft SQL Server are supported.
This document is intended for Milestone XProtect users or LNVR users who have migrated to
XProtect.
Introduction
In order to integrate a Milestone XProtect system with OnGuard, there are several things to consider
when installing XProtect, adding it to OnGuard, installing the additional software packages that are
required, and configuring everything (specifically the credentials). This document provides step-bystep
details and highlights some of the trickier parts that need an extra level of attention.
System Overview
An XProtect / OnGuard integrated system consists of the following components: An XProtect
Management Server, one or more XProtect Recording Servers, the Milestone Open Network Bridge,
the OnGuard Video Web Package (OVWP), the OnGuard Server, the Milestone OnGuard Add-on, and of course, one or more OnGuard clients and/or browser clients.
The Milestone Open Network Bridge and the OVWP must be installed together on the same Windows system. In addition, there is a component of the Milestone Open Network Bridge, the Open Network Bridge plug-in, that must be installed on the XProtect Management Server.
Figure 1. XProtect / OnGuard Integrated System

DOC-2019-EN-US (13 January 2022) © 2022 Carrier Fire and Security Americas Corporation. revision 2 — 2
Each component in this system has unique requirements with respect to installation and
configuration as described in the following sections:
• Install the Milestone OnGuard Add-on
• Install Milestone XProtect
• Install the OnGuard Video Web Package
• Install the Milestone Open Network Bridge
- Install the Software
- Install the Plug-ins
- Configure the Milestone Open Network Bridge in the Management Client
• Add the OnGuard Video Web Package to OnGuard
• Add an XProtect Recorder to OnGuard
- Format the XProtect Username Properly in OnGuard
• Import the Milestone Cameras into OnGuard
Install the Milestone OnGuard Add-on
Notes: The Milestone OnGuard add-on must be installed not only on the OnGuard server, but on
every OnGuard client and Communication Server workstation as well.
Only OnGuard systems that use Microsoft SQL Server are supported. The add-on will not
work, and is not supported, if OnGuard uses an Oracle database.
This step is quite straightforward, and should be done first. Installation of the add-on only needs to
done once for a given release of OnGuard.
• For Major OnGuard Releases: There will always be a unique Add-on installer for each major
OnGuard release. When upgrading, for example from OnGuard 7.6 to OnGuard 8.0, you actually
need to run the Add-on installer for 8.0.
• For OnGuard Interim Builds: The Add-on installer only needs to be run in "repair" mode if you
are upgrading interim OnGuard builds (like from OnGuard 8.0.XXX to OnGuard 8.0.YYY) or
upgrading to an OnGuard update release (8.0.AAA.XXX to 8.0.AAA.YYY).
To install the Milestone OnGuard add-on, follow the instructions in Milestone’s OnGuard OpenVideo
Integration User Guide (http://download.milestonesys.com/lenel/Milestone-XProtect-OnGuard-
OpenVideo-User-Guide.pdf).
Simply follow the prompts.
After the add-on is installed, the option to add a "Milestone" recorder will be available in System
Administration.
Install Milestone XProtect
Very little needs to be described here that is not already covered in the Milestone documentation. The
main thing to note is that an XProtect Recorder is not a standalone entity. The XProtect system
consists of a single Management Server and one or more Recording Servers. A Recording Server may
be installed on the same computer as the Management Server, but Recording Servers may (also) be
installed on separate computers and configured for the same Management Server.
DOC-2019-EN-US (13 January 2022) © 2022 Carrier Fire and Security Americas Corporation. revision 2 — 3
It is possible to have more than one Management Server, each configured with a unique set of
Recording Servers, but this type of configuration requires an additional level of attention which is
covered in the Install the Milestone Open Network Bridge section.
The Management Server is responsible for all authentication required in the XProtect system.
XProtect supports three (3) forms of authentication: Local User, Windows, and Basic.
• "Local User" is only supported when logging into a Management Client or Smart Client. Basically,
this refers to "the current Windows user" and is similar to Single Sign-on. No password is
required.
• "Windows" refers to Active Directory. A valid Windows or domain username and password is
required for authentication. This is the only form of authentication supported by OnGuard!
When you add an XProtect Recorder to OnGuard, the credentials you provide must be those of a
valid Windows account or domain account to which the Management Server can authenticate.
• "Basic" requires you to add users directly to the Management Server via the Management Client.
For a more consistent web streaming experience, make sure to configure your cameras with the GOV
length approximately equal to the frame rate - meaning an I-frame is delivered every 1 second.

Important: Although XProtect supports channels configured as MJPEG, it does not
support MJPEG streams via RTSP. This is a critical path to delivering media
streams to web client applications, so avoid using MJPEG.
H.264 should be used (but not H.265).
Note: If you are installing Milestone XProtect 2020 R2, you will also need to download and
install the Event Service hotfix available here:
http://download.milestonesys.com/MIPSDK/HOTFIX/EVS/
Recording Server Name
1. When you eventually add the recorder (known as the "Recording Server") to OnGuard, you need
to specify an address. You can (but are not required to) use a Fully-qualified Domain Name
(FQDN). If you choose to identify the recorder by its FQDN, make sure the name you provide in
OnGuard is the "Host name" that is displayed for this recorder in the Management Client.
DOC-2019-EN-US (13 January 2022) © 2022 Carrier Fire and Security Americas Corporation. revision 2 — 4
2. If it is not, for example, if the FQDN you are providing has some additional domain designation
that the "Host name" does not reflect, then modify the recorder "Name" property so that it
matches the FQDN you are providing:

Install the OnGuard Video Web Package
The OnGuard Video Web Package (OVWP) is a software product that acts as a "gateway" that provides the link between a video web application and a recorder or video system. In this case, it refers to an XProtect system. The OVWP relies on the Milestone Integration Platform (MIP) SDK for all command and control operations initiated by the OnGuard web applications.
RTP/RTSP is used for retrieving media streams on behalf of the OnGuard web applications.
The OnGuard Video Web Package installs three services, collectively known as the LenelS2 Video Web Services (LVWS):

DOC-2019-EN-US (13 January 2022) © 2022 Carrier Fire and Security Americas Corporation. revision 2 — 5
1. When you install the OnGuard Video Web Package, the following configuration screen is
presented:
Enable authentication: You select Enable authentication, or leave it unselected. Enabling
authentication requires that you configure the same username and password here that will be
used when you add the OnGuard Video Web Package to OnGuard later.

2. The port assignments will be used by the web applications to connect to this OnGuard Video
Web Package. They default to 80 and 443, but as these ports are sometimes used by other web
servers, a good practice is to choose a different set of ports.
Important: The ports numbers entered here must be opened in the Windows Firewall as
allowed incoming TCP ports. This configuration can be changed later. A shortcut is created that must be run "As Administrator", but if changes are made, the LenelS2 Video Web services have to be restarted manually. There are also shortcuts created for starting and stopping the web services.
Important: The OVWP must be installed on the same Windows server as the Milestone
Open Network Bridge. Together, these two packages should ideally reside on
their own system. It is not recommended to install them on an XProtect
Management Server, XProtect Recording Server, or an OnGuard Server.
Install the Milestone Open Network Bridge
Install the Software
1. Download the software. The Milestone Open Network Bridge is a separate Milestone product
that can be downloaded for free from the Milestone website: https://doc.milestonesys.com/
latest/en-US/portal/htm/chapter-page-onvif.htm This will take you to the "launch" page for
that product and includes links for documentation and downloading the software.
DOC-2019-EN-US (13 January 2022) © 2022 Carrier Fire and Security Americas Corporation. revision 2 — 6
2. The Milestone Open Network Bridge MUST be installed on the same Windows server as the
OnGuard Video Web Package. Together, these two packages should ideally reside on their own
system. It is not recommended that they be installed on an XProtect Management Server,
XProtect Recording Server, or OnGuard Server.
3. During installation of the Milestone Open Network Bridge, choose the "Typical" installation type
which installs all the components: The Open Network Bridge Server, and both the 32- and 64-bit
plug-ins.
Note: The Milestone Open Network Bridge consists of two services: The ONVIF Bridge Service
and the RTSP Bridge Server. An XProtect integration with OnGuard does not use the
ONVIF Bridge Service at all, but the OnGuard Video Web Package does use the RTSP
Bridge Server for retrieving media streams.
4. The Milestone Open Network Bridge must be configured to point to a single Management
Server. Each Management Server can support multiple Open Network Bridges, but the Open
Network Bridge may only be configured for a single Management Server. The impact of this
limitation is this: If you have multiple Management Servers, you will need multiple Open
Network Bridge systems, each one being installed with a unique instance of the OnGuard Video
Web Package.

Install the Plug-ins
In addition to installing the Milestone Open Network Bridge together with the OnGuard Video Web
Package, you also need to:
1. Install only the 32- and 64-bit plug-ins on the system running the Management Client. For most
customers, this will be the Management Server.
2. Run the Open Network Bridge installer on the Management Client system.
3. Select the “Custom” installation type.
DOC-2019-EN-US (13 January 2022) © 2022 Carrier Fire and Security Americas Corporation. revision 2 — 7
4. Select ONLY the two plug-in components for installation.

Configure the Milestone Open Network Bridge in the Management Client
This is one of the most critical steps in the entire process.
Media is delivered to the web applications by the OnGuard Video Web Package (OVWP) via a
websocket, but the OVWP retrieves its stream via RTP/RTSP. The Milestone Open Network Bridge's
RTSP Bridge Service is the Milestone component that provides that stream to the OVWP. The OVWP
must authenticate against the Open Network Bridge Service in order to retrieve media streams.
The authentication credentials used by the OVWP will be the same as those provided to authenticate against the XProtect Management Server, and are the same as those configured for the recorder in OnGuard. However, the Open Network Bridge will not honor the credentials by default. You must explicitly assign those credentials to the Open Network Bridge using the XProtect Management Client. In the previous section, you were instructed to install the Open Network Bridge plug-ins on whatever system is running the Management Client. If that was done successfully, when you next launch the Management Client, you should see the new "ONVIF Bridges" entry in the site navigation tree:

DOC-2019-EN-US (13 January 2022) © 2022 Carrier Fire and Security Americas Corporation. revision 2 — 8
Note: The Milestone “ONVIF Bridge” is now known as the “Milestone Open Network Bridge”
which is an open ONVIF-compliant interface for standardized and secure video sharing
from XProtect VMS systems to other IP-based security systems. ONVIF refers the Open
Network Video Interface Forum.
To configure the “ONVIF Bridge” in the Management Client, complete these steps:
1. Right-click on “ONVIF Bridge” option, and then select Add New to add the installed Milestone
Open Network Bridge server.

2. If the Add New option is not available when you right-click on "ONVIF Bridges", then the
Milestone Open Network Bridge was mis-configured. Make sure the Milestone Open Network
Bridge points correctly to the Management Server. You can also try restarting the Milestone
Open Network Bridge service.
3. Next, you must add the same user credentials that OnGuard will use to authenticate against the
Management Server. Before continuing, you may want to review the Format the XProtect Username
Properly in OnGuard section.
DOC-2019-EN-US (13 January 2022) © 2022 Carrier Fire and Security Americas Corporation. revision 2 — 9
4. When the information in that section is understood, provide the username and password, and
then click [Add user]: The credentials must match those configured for the recorder in OnGuard. The username entered here is whatever follows the '@' character in the username configured in OnGuard. Exception: If a local Windows account is used for authentication, OnGuard requires a leading single backslash ('\') character before the username. DO NOT include the leading backslash
here.

5. After adding the credentials, be sure to click [Save] on the Management Client toolbar:

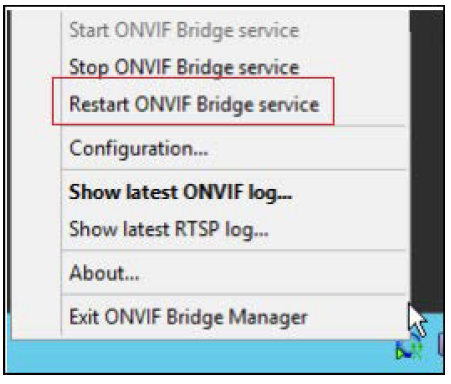
Note: When any changes are made to the Milestone Open Network Bridge credentials in the
Management Client, you need to restart the Open Network Bridge service via the ONVIF
DOC-2019-EN-US (13 January 2022) © 2022 Carrier Fire and Security Americas Corporation. revision 2 — 10
Bridge icon in the system tray. This will restart both the Milestone Open Network Bridge
and the RTSP Bridge services.
Add the OnGuard Video Web Package to OnGuard
OnGuard needs to know about all of the OnGuard Video Web Package (OVWP) installations. When
you add an XProtect recorder to OnGuard, you will need to identify the OVWP that will provide the
gateway linkage to the recorder. Before doing this, OnGuard needs to know about the OVWPs that
have been installed. The interface used to add an OVWP to OnGuard is accessed via System Administration.
1. From the Video menu, select Digital Video, and then select the Auxiliary Services tab.
DOC-2019-EN-US (13 January 2022) © 2022 Carrier Fire and Security Americas Corporation. revision 2 — 11
2. Click [Add], and then provide the necessary information:

• Name: A unique name that will easily identify this OVWP instance.
• Type: Select “OnGuard Video Web Package”.
• Network Address: Enter the fully-qualified domain name of the OVWP Windows
server. IP address is not supported here.
• User Name and Password: If you configured the OVWP instance with credentials,
you must enter them here exactly.
• HTTP Port and HTTPS Port: Enter the port values you configured when installing
the OVWP. They must be opened in the OVWP server's firewall.
3. Click [OK] to save.
4. After the XProtect recorder is added, OnGuard will attempt to read the encryption key from the
OVWP instance. It is vitally important that OnGuard has this key.
5. If key retrieval fails, video will not be available in the web applications. If anything was misconfigured
(incorrect credentials, wrong FQDN provided, ports do not open in the firewall, etc.),
these issues must be corrected. To diagnose this issue, refer to Video Tile Troubleshooting. Once
corrected, click [Update encryption key] to attempt retrieval again.
6. Follow the same process for each OVWP you have installed.
DOC-2019-EN-US (13 January 2022) © 2022 Carrier Fire and Security Americas Corporation. revision 2 — 12
Add an XProtect Recorder to OnGuard
This is where it all comes together.
From System Administration, complete the following steps:
1. From the Video menu, select the Digital Video option to display the Video Recorder tab.
2. Click [Add], and then provide the required information:

• Name: Provide a unique name for this recorder instance.
• Online: Select this check box if the recorder is online.
• Video Recorder Type: Select "Milestone".
• Workstation: Provide the address of the OnGuard Communication Server that will
manage the thick client connectivity to this recorder.
• Use Computer Name of Video Recorder: The address of the XProtect Recording
Service may be specified as the fully-qualified domain name FQDN or IP address;
use this field if using FQDN.
• Use IP Address of Video Recorder: The address of the XProtect Recording Service
may be specified as the fully-qualified domain name (FQDN) or IP address; use this
DOC-2019-EN-US (13 January 2022) © 2022 Carrier Fire and Security Americas Corporation. revision 2 — 13
field if using IP address.
• User Name: This is perhaps the trickiest part of the entire setup, so there is a
special section dedicated just to this item. See Format the XProtect Username
Properly in OnGuard.
• Password: Provide the password corresponding to the username noted above.
• World Time Zone: Select the time zone in which the recorder is operating.
• Daylight Savings: Select this option to adjust times based on DST.
• OnGuard Video Web Package: Select the previously-added OVWP that will manage
the thin client connectivity to this recorder. If you do not see a recently-added OVWP
here, close System Administration, and then reopen it.
3. Click [OK] to save the changes.
Note: If you do not have a recorder installed on your XProtect Management Server, in order to
see XProtect video in Magic Monitor, you will need to add your XProtect Management
Server to OnGuard as if it were a recorder. Follow the previous steps, selecting "Milestone"
as the Video Recorder Type, and providing the address and credentials of the
Management Server.
Note: The first time a camera from a given XProtect recorder is dragged into a Video Tile cell in
the OnGuard Monitor and Surveillance web applications after the OVWP system has been
restarted, there will be a noticeable delay to the start of the video stream. All subsequent
streams from the cameras from that recorder will start within 1-2 seconds of dropping
the camera in the cell. The delay in the first stream after OVWP restarts is due to the
authentication process the OVWP must follow. As the connection to the given
Management Server and recorder are cached, this process is only run once.
Format the XProtect Username Properly in OnGuard
OnGuard has to know the server addresses of both the Management Server (for authentication) AND the specific recorder instance being added. The address of the recorder instance is provided in the “Computer Name of the Video Recorder” field or the “IP Address of the Video Recorder” field. The address of the Management Server needs to be provided in the User Name field.
The correct format for this field is as follows:
<domain>\<username>@<mgmtsvr_addr>
The <domain> is optional. If you are using a simple local Windows account, then you can omit the
domain, but the backslash (‘/’) character must remain! The Management Server address may be in the form of an FQDN or IP address.
Here are some examples of acceptable entries in this field:
MYDOMAIN\MyUsername@MGMTSVR.MYDOMAIN.COM
MYDOMAIN.COM\MyUsername@MGMTSVR.MYDOMAIN.COM
MYDOMAIN.COM\MyUsername@192.10.14.6
\MyWindowsUser@MGMTSVR
\MyWindowsUser@192.10.14.6
DOC-2019-EN-US (13 January 2022) © 2022 Carrier Fire and Security Americas Corporation. revision 2 — 14
These examples are not acceptable:
MYDOMAIN\MyUsername
MyWindowsUser@192.10.14.6 <== Note the leading backslash is missing
Note: Whatever you enter prior to the '@' character MUST be added (with the same password)
as an ONVIF Bridge user.
Exception: In the ONVIF Bridge configuration, you should not include the leading
backslash (‘/’) if adding a local Windows username. This is explained in the Configure the
Milestone Open Network Bridge in the Management Client section.
Import the Milestone Cameras into OnGuard
To import cameras from Milestone into OnGuard, complete these steps:
1. On the Video Recorder tab:
a. Right-click on the XProtect recorder you just added, and then select Import from Recorder.
The import dialog is opened with the list of cameras available for the recorder.
b. Select the cameras you want to import into OnGuard by clicking on them. This moves them
to the Cameras to import list.
c. After all the desired cameras are selected, click [OK] to import them.
2. On the Camera tab: The imported cameras are now displayed and ready for use.
Video Tile Troubleshooting
The video tile used in OnGuard Monitor and OnGuard Surveillance displays live or recorded video
from the configured XProtect recorder. The following solutions are for issues that might occur when using the video tile.
Video from a Milestone XProtect Recorder
There are two setup requirements for viewing video from a Milestone XProtect recorder in OnGuard Monitor or OnGuard Surveillance:
• The Milestone Open Network Bridge must be installed on the same server as the OnGuard Video
Web Package. For more information, refer to Install the Milestone Open Network Bridge.
• The Milestone Open Network Bridge must be configured with the same credentials as those used
by OnGuard to connect to the XProtect Management Server (OnGuard Video Recorder >
Auxiliary Services form). Milestone Open Network Bridge credentials are configured in the
XProtect Management Client (via the ONVIF user credentials field).
PTZ is not Accessible on a PTZ Camera
If the camera button, which enters PTZ mode, is not visible above the timeline, check the permission settings for OnGuard Surveillance as specified in User Permissions. (See Chapter 4: Client-specific Topics in the Administration Guide for OnGuard Browser-based Client Applications.)
Video is Not Displayed
If video is not displayed and the cause is not related to one of the alerts, the problem could be due to a missing encryption key.
DOC-2019-EN-US (13 January 2022) © 2022 Carrier Fire and Security Americas Corporation. revision 2 — 15
An encryption key is used to ensure secure communication between OnGuard and LenelS2 Video
Web Services. For the LenelS2 NVR and UltraView, the key is read from the recorder when the
recorder is added to OnGuard.
An encryption key is also read from the OnGuard Video Web Package when it is added to OnGuard.
The attempt to read the key can fail for any of the following reasons:
• An IP address was specified for the recorder or OnGuard Video Web Package rather than the
FQDN.
• The user name and password were incorrect or not provided for a recorder or OnGuard Video
Web Package that has security enabled.
• The Enable SSL check box was not selected when LenelS2 Video Web Services or OnGuard Video
Web Package was installed.
• The Secure HTTP port number specified is not the same number configured when LenelS2 Video
Web Services or OnGuard Video Web Package was installed.
OnGuard queries for the encryption key again when any recorder connection parameter is modified
and saved when the [Update Capabilities] button is clicked, or when the [Update encryption key]
button is clicked for an OnGuard Video Web Package.
Troubleshooting the Encryption Key
1. Check the Web Server port settings. From the Start menu, select All Programs > Lenel Video
Web Services. Select Web Services Administration, and then confirm the following:
• Enable SSL: The check box is selected.
• Secure HTTP port: The secure port number is the same number entered in the
HTTPS Port field in the System Administration Connection sub-tab (From the Video
menu, select Digital Video > Video Recorder sub-tab).
For Lenel NVR and UltraView:
1. Check the following settings on the OnGuard System Administration Digital Video > Connection
sub-tab:
• Use Computer Name of Video Recorder: The fully qualified domain name (FQDN)
is required for OnGuard Monitor or OnGuard Surveillance video.
• User Name and Password: For recorders with security enabled, the user name and
password are required.
2. If no changes are needed to the FQDN, credentials, or port configurations, click the [Update
Capabilities] button to force a re-read attempt of the encryption key.
For OnGuard Video Web Package:
1. Check the following settings on the OnGuard System Administration Digital Video > Auxiliary
Services sub-tab:
• Network Address: The fully qualified domain name (FQDN) is required for
OnGuard Monitor or OnGuard Surveillance video.
• User Name and Password: For OnGuard Video Web Packages with security
enabled, the username and password are required.
2. If no changes are needed to the FQDN or credentials, click the [Update encryption key] button
to force a re-read attempt of the encryption key.
DOC-2019-EN-US (13 January 2022) © 2022 Carrier Fire and Security Americas Corporation. revision 2 — 16
Edge Browser
Connection issues to some or all video recorders could be experienced if using an Edge browser on
the computer where the OnGuard server is installed and “localhost” is used to access the video host
application.
1. Replace “localhost” in the browser URL with the public IP address or Fully Qualified Domain
Name of the computer.
2. If the previous step does not resolve the connection issues, run the following command from the
Windows command prompt as administrator:
CheckNetIsolation LoopbackExempt -a -
n="Microsoft.MicrosoftEdge_8wekyb3d8bbwe"
Magic Monitor
When you launch Magic Monitor and log into OnGuard, Magic Monitor will create 2 instances of each
camera imported into OnGuard. Only those listed under the Management Server entry will be
functional. The entries that are listed under each individual recorder are non-functional duplicates.
This is a known issue and will be fixed in a future release.