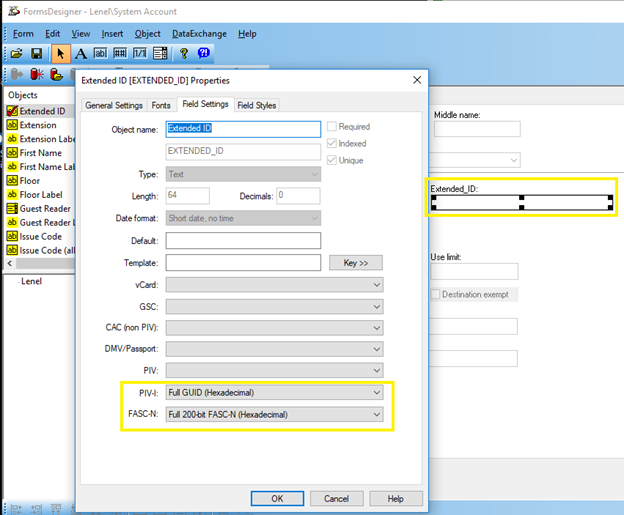
How to enable the “Extended_ID” value in Forms Designer to support PIV/CAC cards.
Procedure Steps
To insert the Extended_ID field into OnGuard:), select the Cardholder form, then navigate to the Badge tab.
- Log into Forms Designer.
- Confirm you have an updated backup (perform a backup first).
- Select Insert > System Object > Extended ID. This will place a new field into the Badge tab.
- Move this field to a blank area.
- If you have the full Forms Designer license, provide a title for this field. If you have Forms Designer Lite, you can add the field, but you cannot change its title.
- Once the field is added to the page, double-click on the field to open the Properties dialog.
- Navigate to the Field Settings tab and select the following values:
Under PIV-I: select Full GUID (Hexadecimal)
Under FASC-N: select Full 200-bit FASC-N (Hexadecimal)
- Click [OK] to save the values.
- Click [Save] icon to update the OnGuard database.
- Select your option to save.
- Close out of the Forms Designer and log out of all OnGuard applications, then log back into OnGuard to refresh all clients.
Applies To
OnGuard version 7.2 and later
Additional Information
Make sure to create the Extended_ID card formats and assign these to your readers.
Additionally, configure the system hardware setting to allow the extended ID to be downloaded to the panel every time an active badge is added or modified:
- Choose System Options from the Administration menu, and then click [Modify].
- On the Hardware Settings tab, configure the Maximum extended id length:
- If the full GUID is mapped to the extended ID, 16 bytes are required.
- If the full FASC-N is mapped to the extended ID, 25 bytes are required.
© 2024 Honeywell International Inc. All Rights Reserved.
