Enabling SCPDebug with ScpSIODebugFlags
Procedure Steps
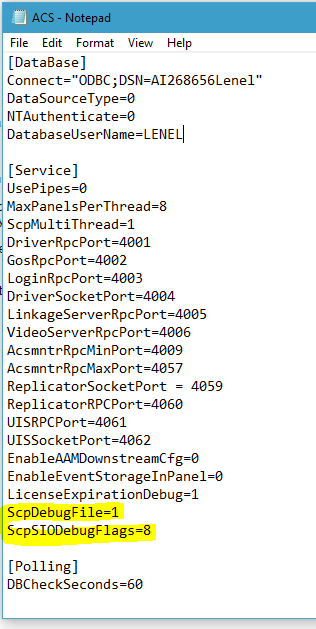
To enable SCPDebug with ScpSIODebugFlags:
Note: You must launch Notepad as an Administrator and open the ACS.ini file with Notepad.
- Enable SCP Debug in the ACS.INI file on the server running Communication Server.
- Find the [Service] section of the ACS.INI file.
- Set ScpDebugFile=1.
If ScpDebugFile is not listed in the [Service] section, add it (entries in ACS.INI are case sensitive).
- Enable ScpSIODebugFlags in the ACS.INI on the server running Communication Server.
- Find the [Service] section of the ACS.INI.
- Set ScpSIODebugFlags=8.
If ScpSIODebugFlags is not listed in the [Service] section, add it. The ACS.INI file should now have the following entries in the [Service] section in addition to the other default entries:[Service] ScpSIODebugFlags=8 ScpDebugFile=1
- Restart the LS Communication Server service. Debug files are written to the root of the Windows directory (C:\Windows\system32). The two files are named SCPDebug.txt and SCPDebugc.txt.
- In System Administration > Readers, select the reader you will be testing and click [Modify], then click [OK]. This enables the SIO Debug Flags for the readers.
- Test the reader to reproduce the problem you are troubleshooting.
- Disable ScpDebugFile and ScpSIODebugFlags by setting both values to 0 in the ACS.INI file.
- Restart the LS Communication Server service.
- Send to Technical Support the SCPDebug.txt and SCPDebugc.txt files.
- Provide the Badge ID of the badge being used and the date/time that the tests were conducted.
Example:
Applies To
OnGuard (All versions)
